How to make and program an FPV drone

Explanation of how the parts work
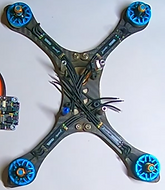
Frame: The frame that is usually made of carbon fiber that determines the shape of the drone. You have to fix all the parts on it. There are different types of Drone Frames, for example a quadcopter has 4 arms, hexacopter has 6 arms, tricopter has 3 arms, octocopter has 8 arms, there are many more frames.
Engines: All drones have a motor at the end of the drone that ensures that the propellers can turn. When you buy a motor, there are specifications on the motor, so you can see which parts (ESC, flight controller) you can use with the motors. You can find the motors in different models, from small to large, expensive and cheap, with brand and there are also drones motor that do not have a brand. For large engines you naturally need a larger frame because it forms a greater carrying capacity due to the large propellers. And the reverse is true for small drones. When choosing a motor, there are 4 numbers written on the motor after the KV. That number indicates the speed of the motor. The higher the number, the more rotations per minute the motor makes if the motor is supplied with 1 V (volt).
ESC: The ESC tells the motors how hard it should run. This is important because all motors must run at the same speed. For each motor you use 1 ESC or you can use a 4in1 ESC.
Flight controller: One can be compared to the brain of the drone. You have to solder all parts (camera, vtx, motors, battery connector, ESC and much more) on it. The flight controller also has an IMU built in, which ensures that it can fly stably in the air.
Battery: For the battery, the lipo battery is most often used because when flying a drone, the lipo provides the necessary power for all electronic components to function, and it has a relatively low weight.
Vtx: The video transmitter, also called vtx, which is responsible for sending the video from the Fpv camera wirelessly to the Fpv goggles. The only function of the vtx is to send the video to the camera, and it functions independently of the camera or the camera or its settings.
(This means that the VTX does not affect the image quality or other settings of the camera. The camera and the VTX are two separate components that work together to transmit video, but they function independently of each other.)
Camera: You use the camera to be in front of the drone using the FPV goggles.
Antenna: You need that to send the signal between your vtx and camera, vtx with Fpv goggles and the receiver with the transmitter.
FPV goggles: You can use this to see the front of the drone. Because you can also use a Fpv screen or you can fly the drone in the field of view.
Propellers: Reduce weight and number of rotations per minute.
Receiver: The job of the receiver is to send the signal from the transmitter to the flight controller.
Transmitter: The transmitter sends a signal to the receiver (receiver) that is attached to the flight controller on the drone.
With the analog glasses, the quality is not the best, but it has a low latency. This refers to a minimal delay in the processing of computer data over a network connection. The lower the processing latency, the closer real-time access is.
With the digital glasses, you get a nicer picture, but it has high latency, so what you see is that there's a jump on your screen. The journey to the vtx and back takes longer. Delay is known as input lag.
There are two types of signals digital and analog

1. Assemble the frame
Before you start soldering, you must first assemble the frame.
To assemble the frame, start by placing the arms and arm lock on top of the bottom plate.
Fasten the bottom plate with pressure nuts on the arms with screws from the bottom. Then place the eight aluminum spacers.
The steps to be able to make an FPV drone
2. Confirm Motors
Now you need to attach the 4 motors to the frame on each end of each arm. My tip is to put threadlocker on screws so that if there is vibration from the motors they will not come loose. But if the screws that come with your frame are all threadlocked you shouldn't put extra threadlocker on them.
Also when you buy threadlock always the blue type because the red one is permanent but if you use the red one you have to heat up the screws to loosen them.

Make sure you use the correct screws to attach the motors to the arm and make sure they are not too long that they do not touch the motor windings!

3. Wiring diagram
You use this if you have an analog camera.

You use this if you have a digital camera.

Before soldering any wires, you can “dry fit” all the components in the frame . This process allows you to measure wire lengths, determine component placement, and identify any spacing issues.
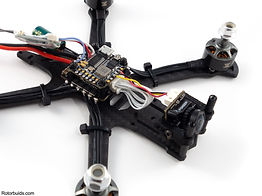
4. Install the ESC and flight controller
Replace the four shorter screws securing the frame with the longer screws found in the package of M3 screws.

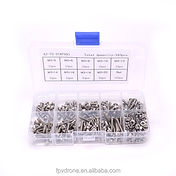
But before you buy a flight controller, make sure you also buy a pack of M3 screws of different lengths.
Now slide the 4 in 1 ESC and flight controller board between the screws, making sure that the battery power pads of the ESC board are facing backwards and the motor solder pads are facing up.
Recognition of the front of the frame is possible by paying attention to the recesses intended for the mounting plates of the camera.
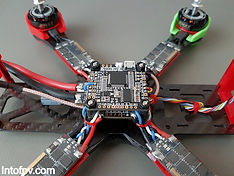
Double check that the ESC and flight controller are not touching the frame as it may cause a short circuit.
Check the necessary lengths of the motor wires, leave some space and cut them to size. Attach the wires from the motors to the arms using 2mm lage zip ties or electrical tape.

Cut about 2mm from the ends of the wires and then solder the ends.
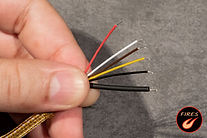
Now solder the 3 wires you cut off 2mm to the four spots left to right or right to left but in this order on the ESC. And solder the + red and - black battery cables and a 1500uF capacitor to ESC where you also have to solder the battery cables.

5. Solder the connector to the flight controller
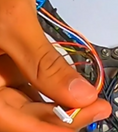
Solder (red + and black -) cables to the Xt60 connector and then solder those two cables back to the + and - pads on the flight controller according to the instruction diagram._cc781905-5cde-3194- bb3b-136bad5cf58d_
Check that you have soldered the cables in the right place!
Then you have to connect or solder the signal cable that comes with ESC from the ESC to the flight controller according to the instruction diagram.
If a rubber grommet is not already fitted to the flight controller, you will need to install it yourself.

When you have soldered all parts in the correct place according to the instruction diagram, you can slide the flight on the ESC between the 4 screws.
And check that the arrow points to the flight controller on the front of the drone!
6. Install the analog system or digital system with the camera
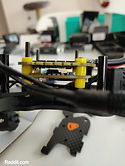
Install the analog camera into the carbon fiber camera mount with two screws.

Then put the camera mount in the frame and cut the camera cables with enough length so that you solder the yellow, red, and black to the flight controller according to the instruction diagram.
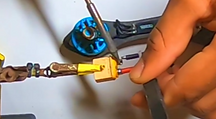
Now take the vtx and put double sided tape under it so you can stick it to the frame. As a tip also fix the vtx with two of the 2mm long zip ties so that the vtx certainly does not come loose.
Next you have to solder the cables from the vtx to the flight controller and do so according to the instruction diagram.
Connect the vtx antenna to the vtx if you don't, there is a big chance that it could cause a short circuit in the vtx when you connect the battery to the flight controller!
Attach the vtx antenna to the rear spacer or under the carbon fiber top plate.


7. Install the Receiver
Solder the receiver cables according to the instruction diagram to the flight controller.

Attach the receiver antennas with their cables to the bottom of the arms with the 2mm long zip ties.

8. Check the parts
Before you connect the flight controller to the Lipo battery, check very carefully that there is no residue of the small solder tin between the electrical parts that could cause a short circuit!
To check if there is a short circuit you can put your multimeter on continuity mode then if there is a short circuit you will hear a sound. Then you have to go through the entire diagram and double check that you have soldered all the cables in the right place.

I recommend investing in a smoke stopper because it is more convenient than a multimeter and will save you a lot of money.

9. Connect the transmitter to the receiver
First you have to press the button on your receiver while connecting the power and at the same time put your transmitter in binding mode. The sender and receiver then “talk” to each other. You can see this because the small red light on the receiver changes from red to green. Then the receiver is connected to the transmitter. (This Is An Explanation For Flysky Receivers)
The method will be different if you use different type of transmitter with different protocols then you need to find your transmitter model on YouTube watch a video explanation.


The steps to follow to program your Fpv drone
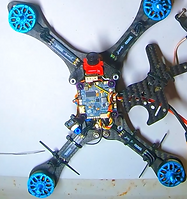
You have attached all parts to the frame, and the drone turns on when you connect the Lipo battery to the flight controller.
Now you have to program the drone, the software you can use is Betaflight.
Do not install the propellers yet!
Connect de Micro USB to the flight controller and the USB to the computer
Step 1: You need a Micro USB cable heen, then connect it to the flight controller and then connect the USB to your computer. If your computer does not make any sound, your cable has not been used properly. Then click on the yellow connect button.
When the button turns red, your flight controller is connected to Betaflight.
Install the new firmware on the flight controllerthere
Step 2:If you install a new firmware on your flight controller, you do this as follows. Go
first go to the "CLI" and type version and check which type of flight controller you have. Press disconnect and press the firmware flasher. Then press "Choose a Board" then find the correct name of your flight controller. Then press "Choose a Firmware version" at the top, press "full chip erase" and press "load firmware" then press "flash firmware".
Betaflight has removed all data from your flight controller and now your flight controller will go into DFU automatically and Betaflight will install the latest firmware for you and will take about 20 to 30 seconds.
But if your flight controller does not want to go into DFU, there is a button on your flight controller when you press it, while you put that micro-USB in your flight controller, Betaflight puts your flight controller in DFU automatically.
Calibrate the accelerometer
Step 3: Press "connect button" make sure your Fpv drone is put on a table that is even. Go to the Setup tab then press "calibrate accelerometer".
You can install Betaflight here
Configure the "smart audio" and receiver
Step 3.1: Here you need to configure "smart audio" and receiver. For the receiver and go to Ports tab and enable "Serial RX" for the UART the receiver is connected to your flight controller.
And then press the Receiver tab and select the "Serial (via UART)" in the Receiver section and choose your receiver's protocol in the section of "Serial Receiver Provider".
For the "smart audio" press Ports tab then enable "TBS Smart audio" then press "Save and Reboot".
Turn on "auto Connect" so you don't have to press the "connect" button every time.
Copy and paste the codes in the CLI tab
Step 3.2:Go to CLI tab and copy and paste these codes there, so you can change settings within the OSD menu in the vtx via your Fpv goggles by moving the two joysticks of your transmitter in the direction of the red arrows._cc781905-5cde -3194-bb3b-136bad5cf58d_
But if you use another type of vtx you can find the codes here.
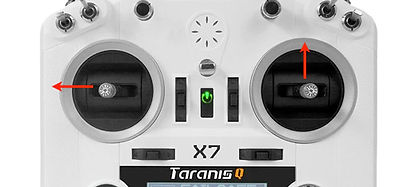
When you move those two joystick you will get an OSD menu in your Fpv goggles and do as follows.
Select the "Feature" option by moving your thortle down and then right.

You will now see the "FEATURES" menu.
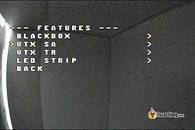
You will now see the "VTX SA" menu.
Select the "VTX SA" option by moving your thortle down and then right.

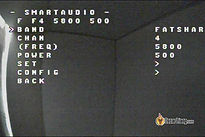
Now you will see "SAMRTAUDIO" menu you have entered the vtx settings.
Select the "BAND","CHAN" (Channel), or POWER option if you want to change them by moving your thortle down and then right.
And to save all settings select "SET" and then select "Confirm"
Select the settings you want in the OSD menu
Check if the receiver is working properly
Step 4: Then check if the receiver works properly on the "Receiver" section. The bars (channels) should move when you move the sticks on the transmitter. If the wrong channels respond, try a different channel configuration, such as "default (AETR)" or "TAER"."

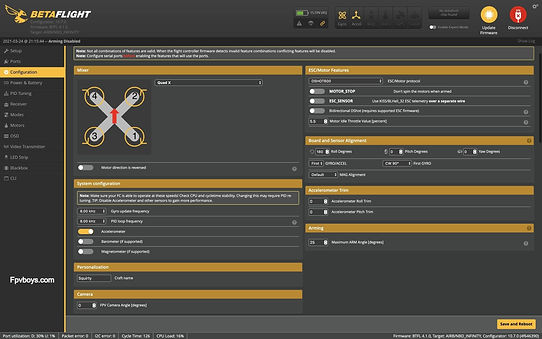
Configure the engines
Step 5:Press the configuration tab and go to the "ESCMotor Features" section choose "DSHOT600" and for the "Motor Idle Throttle value [percent]" choose 5.5.
In Arming mode change the 25 for 180 so you can use "Turtle" mode.
In short "Turtle" mode allows you to reverse your drone's motors using the circuitry on your transmitter, which you use to turn your drone over if it has fallen upside down.
Scroll down and go to the "Other Features" section and enable "AIRMODE","OSD","ANTGRAVITY" and DYNAMIC_FILTER. And press Save and Reboot.
Check that the arrow on the flight controller is pointing in the right direction!
Step 6: Checkthat the arrow on the flight controller points to the front of the drone, you can see that when you press the Receiver tab and look at the Preview mode.
But if you move the drone and the flight controller is not pointing in the right direction in Betaflight you can easily adjust the direction in the configuration tab via the Board and Secor Alignement mode.

Type the battery setting
Step 7: Press the Power & Battery tab go to the Battery section and change the "Warning Cell Voltage" from 3.5 to 3.7 if you are a beginner that will send you a reminder by making a sound through the beeper that you attach to your flight controller have soldered.

Leave the settings in the "PID Tuning" tab
Step 8: At the PID-Tuning Tab if you are a beginner, I recommend leaving all Pids at default.

Configure the Mode on the circuit at the transmitter
Step 9: At the Modes tab there you can choose which circuit on your transmitter for your drone.
To be able to configure it you have to press the "add Range" "ARM" button then choose a switch that is easiest for you to turn your left finger on and off.
You have to switch that switch then the Betaflight will automatically detect the switch and it will know exactly which switch you have moved.
Then you will see a yellow bar and when you flip that switch you should see a little yellow dot. If the yellow bar matches the yellow dot, it means the drone is going to "arm".
The same method applies to the other mode you want to set.
The other modes you need are: Angle mode, Horizon mode, Air mode and lastly the Flip over after crash (turtle mode).
Step 10:Don't install your propellers yet!
Now you need to press the Motor tab to test your motors if they are turning in the right direction.
This is how you connect your lipo battery to your flight controller and also connect your micro-USB to your flight controller.
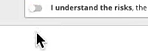
In Motor mode in Betaflight, turn on the "I understand the riks" then move the blue "Master" circle up a bit. Your engines should start running.
You can check it by putting a piece of tape on the top of the motor where you have to place the propeller, then you can see in which direction the motors are turning. And also check that each engine has the correct number.
Check if the motors rotate in the correct direction


But in Betaflight 4.3 if you don't have the engines in the right place you can change it via software. To do that you have to disable the "I understand the riks" circuit, then press "Reorder motors". You will receive a message, then press "I understand the risks" again and press "start".
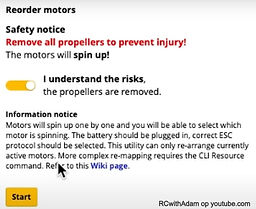
You will get a message again written at the bottom ("Click on the spinning motor) then do for each motor.

Then it tells you at the bottom of "Ready Check the motor spinning order by clinking on the image". Then press the save button. Now Betaflight will reset the drone and save all data.
Now press back on the motor tab and test if the motors 1,2,3,4 are in the right place by sliding the blue circle up a bit for each number.

But if your motors are not turning in the right directions either, you can also adjust the motors direction via Betaflight.
Here's how to go to the motor mixer section turn on the switch and then press "Save and Reboot".

Go back to the Motor tab and uncheck the "I understand the riks" Press the "Motor direction" button.
You will receive a message, then press "I understand the risks" again and press "Wirzard".

You get this picture press "Start / spin motors".
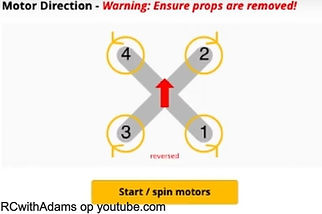
Then you will see this picture do what is described below ("Click on motor numbers individually to change spin direction Verify all motors are spanning correctly").

When you are done press "close" and controller if all the motors are turning in the right direction by putting a piece of tape on the top of the motor where you need to place the propeller, then you can see in which direction the motors are turning.
You can see it by moving the blue "Master" circle up a bit.
Step 11: To finish your Drone build grab four nylon nuts and screw your flight controller onto esc.
The last steps to prepare the drone

Step 11.1: Install the carbon fiber top flat on the frame and slide a battery mount underneath as well. You can also stick that "Ummagrip Sticky Battery Pad" on that top plate so that your battery does not drag against writing and that ebb cannot slip away.

Step 11.2: Now you can finally place your four propellers on the motors, but make sure you put them in the right place.
Secure them all with the four M5 nuts that came with the motors.
But don't screw them too hard!

You are ready to fly your first drone, grab your transmitter and your Fpv goggles and all the batteries you have and go outside, touch some grass and explore the world boy or girls! 😉